How To Make A YouTube Video With AI, From Research To Publish
Most faceless channels are one person. No studio, no camera worth insuring, no crew. The whole operation is a laptop, a few tools and a process that gets repeated every week.
The process is the part nobody shows you. Beginners get handed a list of tools and told to start, which is roughly like being given a kitchen and no recipe. You end up with generated footage before you have a script, a voice track that does not match the pictures, and a video that took four days and holds nobody’s attention.
Here is the whole pipeline in the order it actually has to run, from deciding what the video is about to hitting publish.
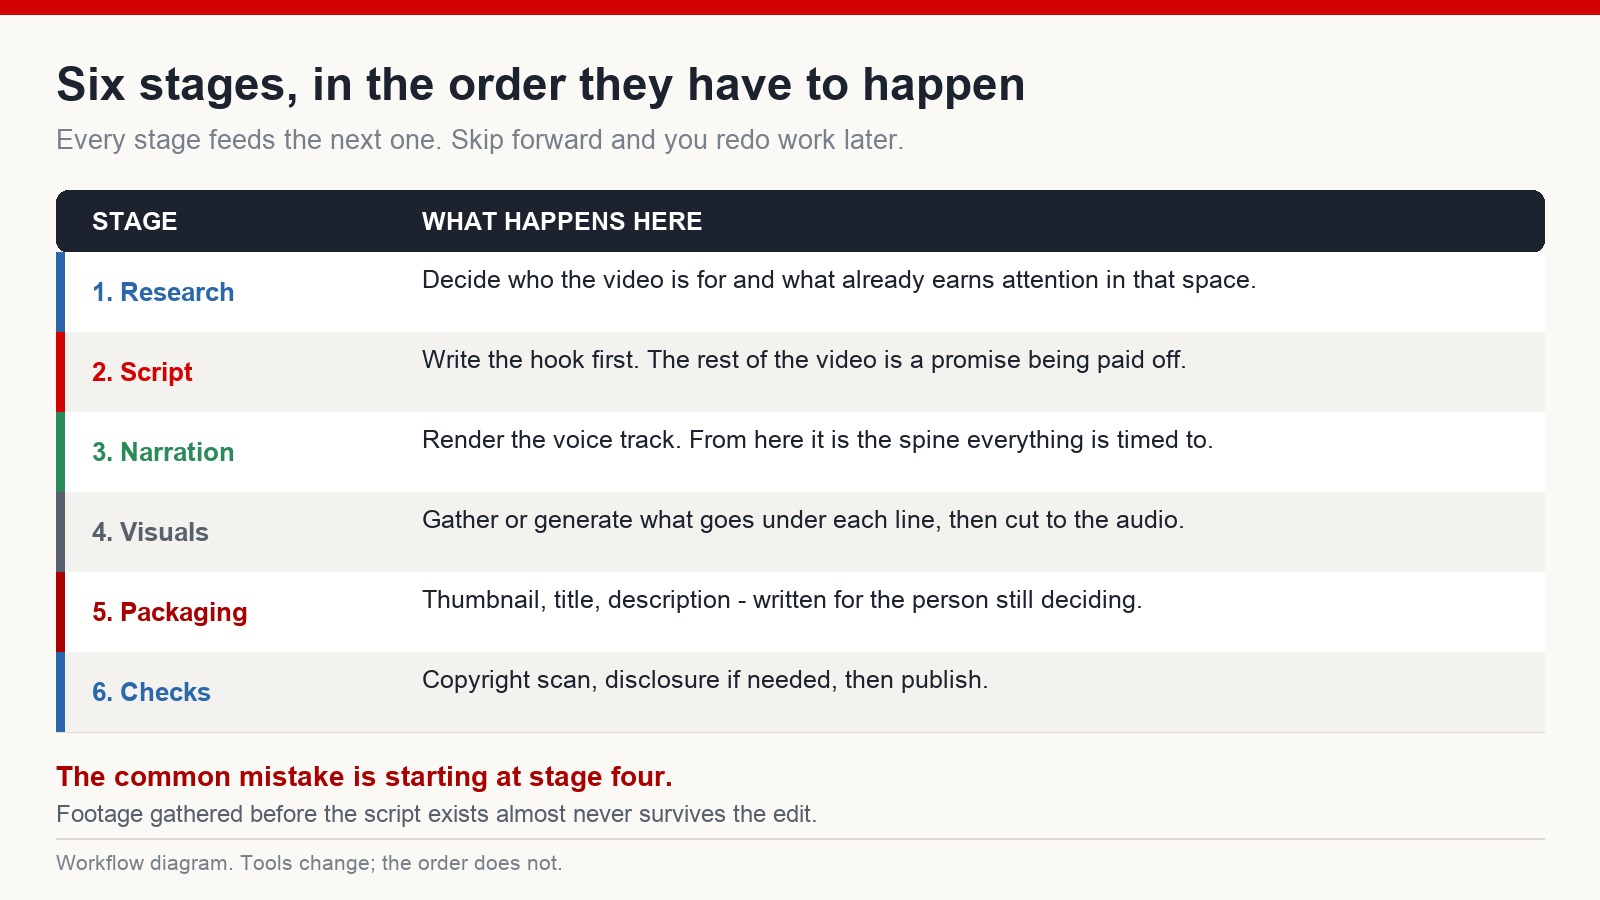
Stage 1: research, before anything else
This stage decides most of the outcome. Not because research is glamorous, but because a video aimed at nobody in particular performs exactly as well as that sounds.
The mistake is making videos out of enthusiasm. Enthusiasm is what keeps you going; it is not what the recommendation system responds to. What it responds to is content that matches a demand somebody already has.
Give yourself a clean account to research from
Recommendations are heavily personalised. If your everyday account is full of music, gaming and whatever you watched at two in the morning, the feed you use for research is contaminated before you start.
Set up a separate account and keep it clean – no random subscriptions, no unrelated watch history. Watch only in the niche you are researching. Within a few days the recommendations become a genuinely useful signal about what that audience is being shown.
Look at small channels, not big ones
The instinct is to study channels with millions of subscribers. That tells you what worked years ago for a channel with momentum you do not have.
The more useful signal is a young channel with a recent video far above its own average. That means the topic is being pushed to new audiences right now, and a small channel with no history was able to ride it. Those are the openings.
Research tools help here – the ones that show search demand, competition and a channel’s average views. But your own analytics page, once you have published a few videos, will eventually tell you more than any of them.
Stage 2: writing the script
This is where faceless channels win or lose. Everything downstream – voice, footage, edit – is delivery. If the script has no shape, nothing rescues it.
Study the structure of videos that work
A useful exercise: take a video in your niche that people finish, and break down how it is built. Where does the promise land? How soon does the payoff start? Where does the direction change? What does the ending do?
A language model is genuinely good at this kind of breakdown, and it is faster than doing it by hand. But be clear about the line. Analysing structure is research. Taking someone’s captions and republishing a reworded version is a copyright and policy problem, and it leaves you with a channel that has nothing of its own. Learn the shape, then fill it with your own material.
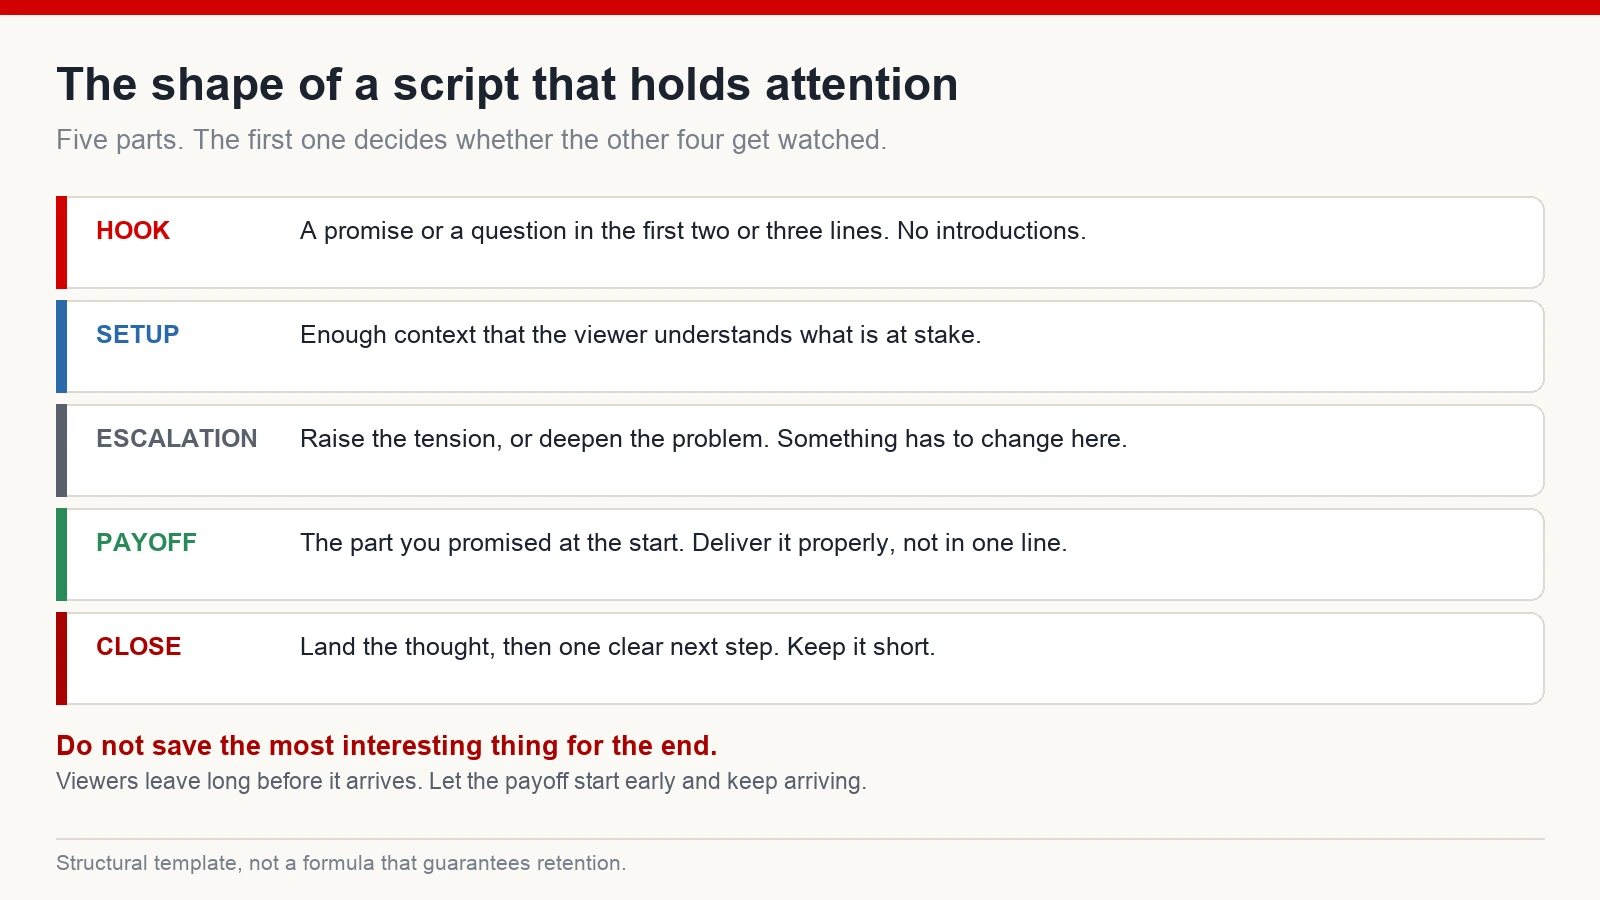
The hook is two or three lines, not thirty seconds
Skip the introduction. Skip the channel greeting. Open with something the viewer wants resolved – a claim, a tension, an image that does not make sense yet.
The rest of the video is that promise being paid off. Which means the most interesting thing you have should not be saved for the end. Viewers leave long before the end. Reorder so the payoff starts early and keeps arriving.
Where the assistant helps, and where it does not
A model is fast at first drafts, alternative angles and rewriting a clumsy sentence into something speakable. It is poor at knowing which detail matters, which is exactly the judgement that separates a good script from an evenly-toned wall of text. Draft with it, cut without it.
Stage 3: the voice track
With the script finished, render the narration. This order is not negotiable: the voice track becomes the spine, and every visual decision afterwards is timed to it.
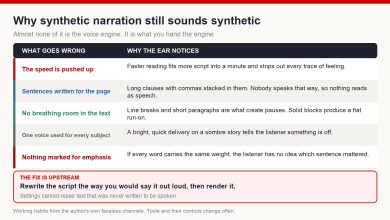
Practical things that make synthetic narration sound human: short sentences, real punctuation, deliberate line breaks where a thought should land. Do not paste in a wall of prose and hope. Render in sections – hook, middle, close – rather than in one long pass, because tone tends to drift across long renders.
Test one paragraph in several voices before committing to a full video. A voice that sounds fine for thirty seconds can become tiring at eight minutes.
Stage 4: visuals and the edit
Now you build pictures under the audio. Sources worth mixing: generated images and video, licensed stock footage, motion graphics, and simple charts or diagrams you make yourself. A video built from one source alone tends to feel flat, whichever source it is.
The single most common beginner error is leaving a shot on screen too long. Static frames drain attention faster than almost anything else. Keep something changing – a slow push in, a cut to a related shot, a graphic arriving as it is mentioned. Roughly every few seconds there should be a reason for the eye to stay.
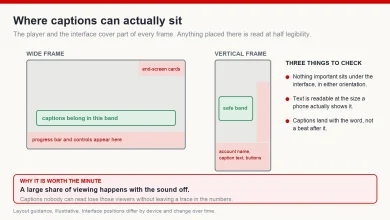
A free consumer editor with automatic captions is enough for all of this. The software is not the constraint.
Stage 5: packaging
The thumbnail and title are what most people meet before the video exists to them at all. It does not matter how good the edit is if nobody opens it.
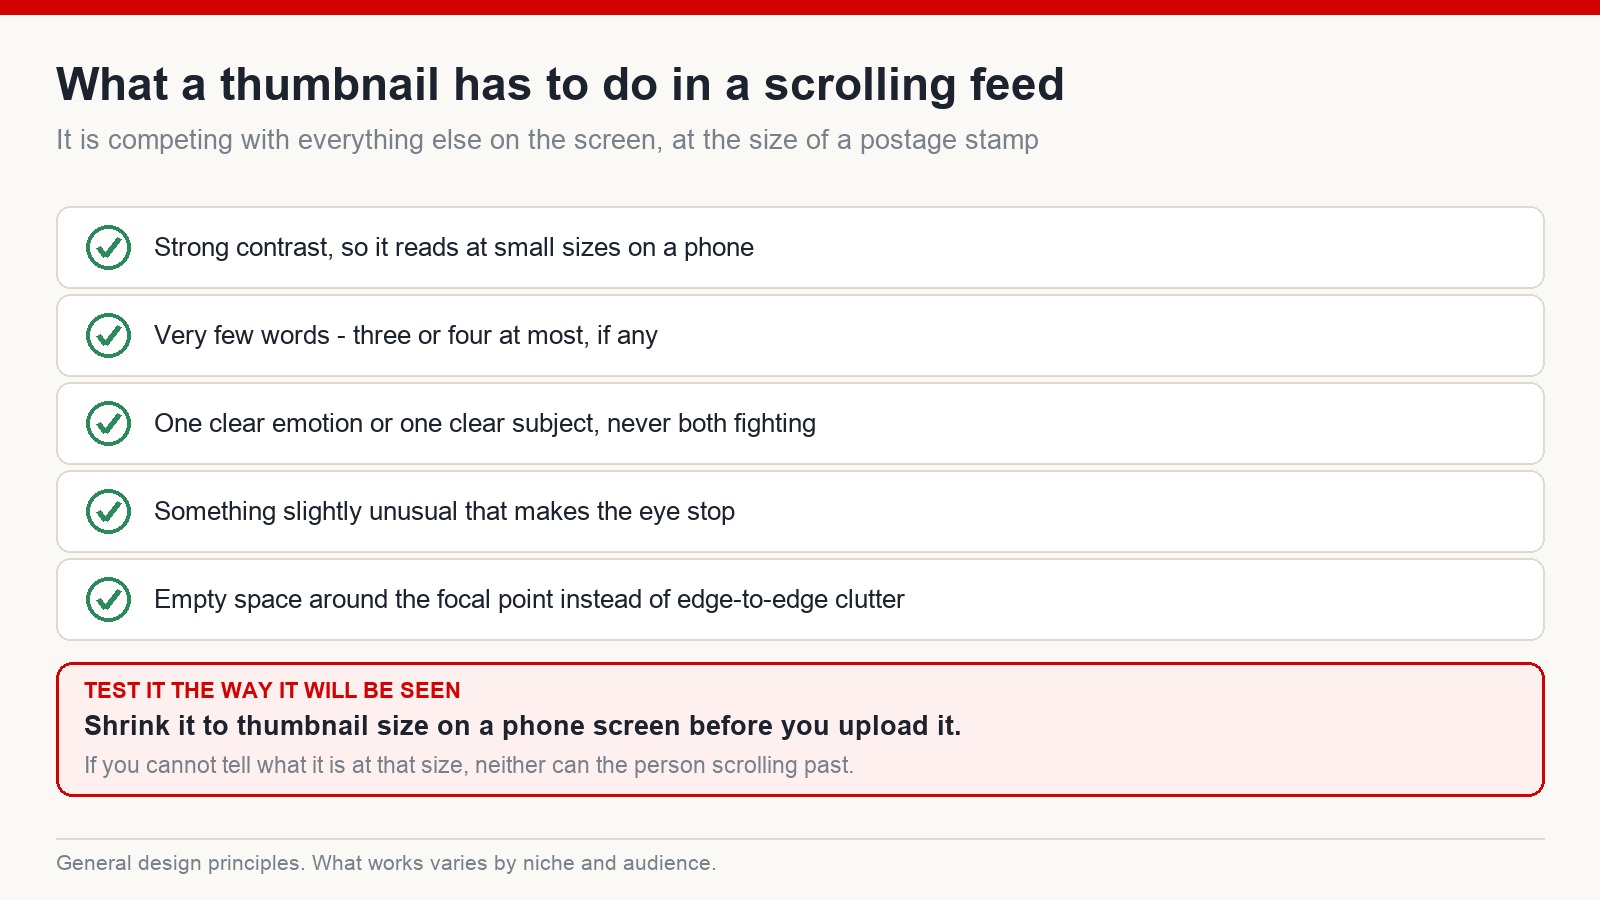
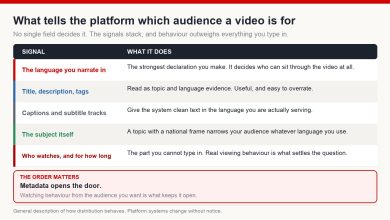
Then the metadata. A clear title carrying the phrase people actually search for. A description that explains the video in plain language rather than stuffing keywords. Tags that are relevant instead of numerous. Chapters if the video is long enough to need navigation. Hashtags sparingly. A model can generate ten title options in seconds, which is useful – just pick one that describes the video honestly, because a title that overpromises costs you in retention what it gained you in clicks.
Stage 6: checks before publishing
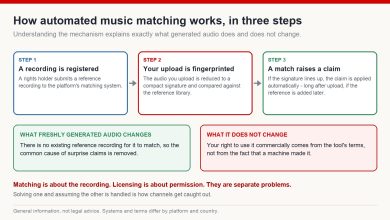
Upload as private and let the platform’s copyright checks run before anything goes live. They scan music, footage and images against registered works. Fixing a flagged asset before publication takes minutes; fixing it after a claim lands takes considerably longer.
Also consider disclosure. Realistic synthetic footage, altered audio of a real voice, or a real person appearing to do something they did not, all need to be labelled. A synthetic narrator reading your own script over stylised visuals normally does not. The rules have changed more than once, so check the current help pages rather than a summary.
The mistake underneath all the others
It is assuming the tools do the work.
They speed up production. They do not supply the idea, the story, the sense of where a video is dragging, or an understanding of who is watching. Channels that fail rarely fail because the AI was bad. They fail because the content had nothing in it – no point of view, no reason for a specific person to keep watching.
Two channels can run identical software and end up in completely different places. The difference is upstream of every tool on the list.
Frequently asked questions
Can a channel made with AI actually earn?
Channels using AI in production do get monetised, through advertising and other routes. But earnings depend on niche, audience geography, watch time and consistency, and plenty of channels never reach the threshold at all. Treat it as a business you are building, not an outcome you are owed.
Should beginners start with Shorts or long-form?
Shorts are a fast way to test a niche and practise hooks, and they build the reflex of opening strongly. Revenue per view is generally lower than long-form. Many creators run both – Shorts to find out what resonates, long-form to build depth.
Does the platform ban AI content?
No. What is restricted is mass-produced, repetitive or misleading content, and synthetic media presented as real without disclosure. The tool is not the problem; the absence of any actual work is.
How long does one video take at the start?
Longer than you expect, and that is normal. Every step is a decision the first few times. The gains come from repetition – by a dozen videos in, most of the process has become routine and the thinking moves to the idea instead.
Where to start
Do not start by shopping for tools. Start by choosing who the video is for, then follow the stages in order and let each one feed the next.
The first video will be rough. The tenth will be noticeably better. That progression is the whole method, and there is no way to skip it. If you want a structured route through it, the training system at mmoyoutube.com lays out the same stages with guided practice – results vary, and no honest programme will tell you otherwise.